
Choosing no bake dessert specifically to avoid heating up kitchen in summer seemed brilliant until realizing that "no bake" doesn't mean "no mess" or even "easier than baking." The no-bake Biscoff cheesecake cups created more dirty dishes than actual cheesecake would have because individual portions require multiple containers plus all the mixing bowls. Assembling six layers in twelve tiny jars while cream cheese mixture dripped everywhere taught me that sometimes oven based recipes are less chaotic than alternatives marketed as simpler.
What is No-Bake Biscoff Cheesecake Cups
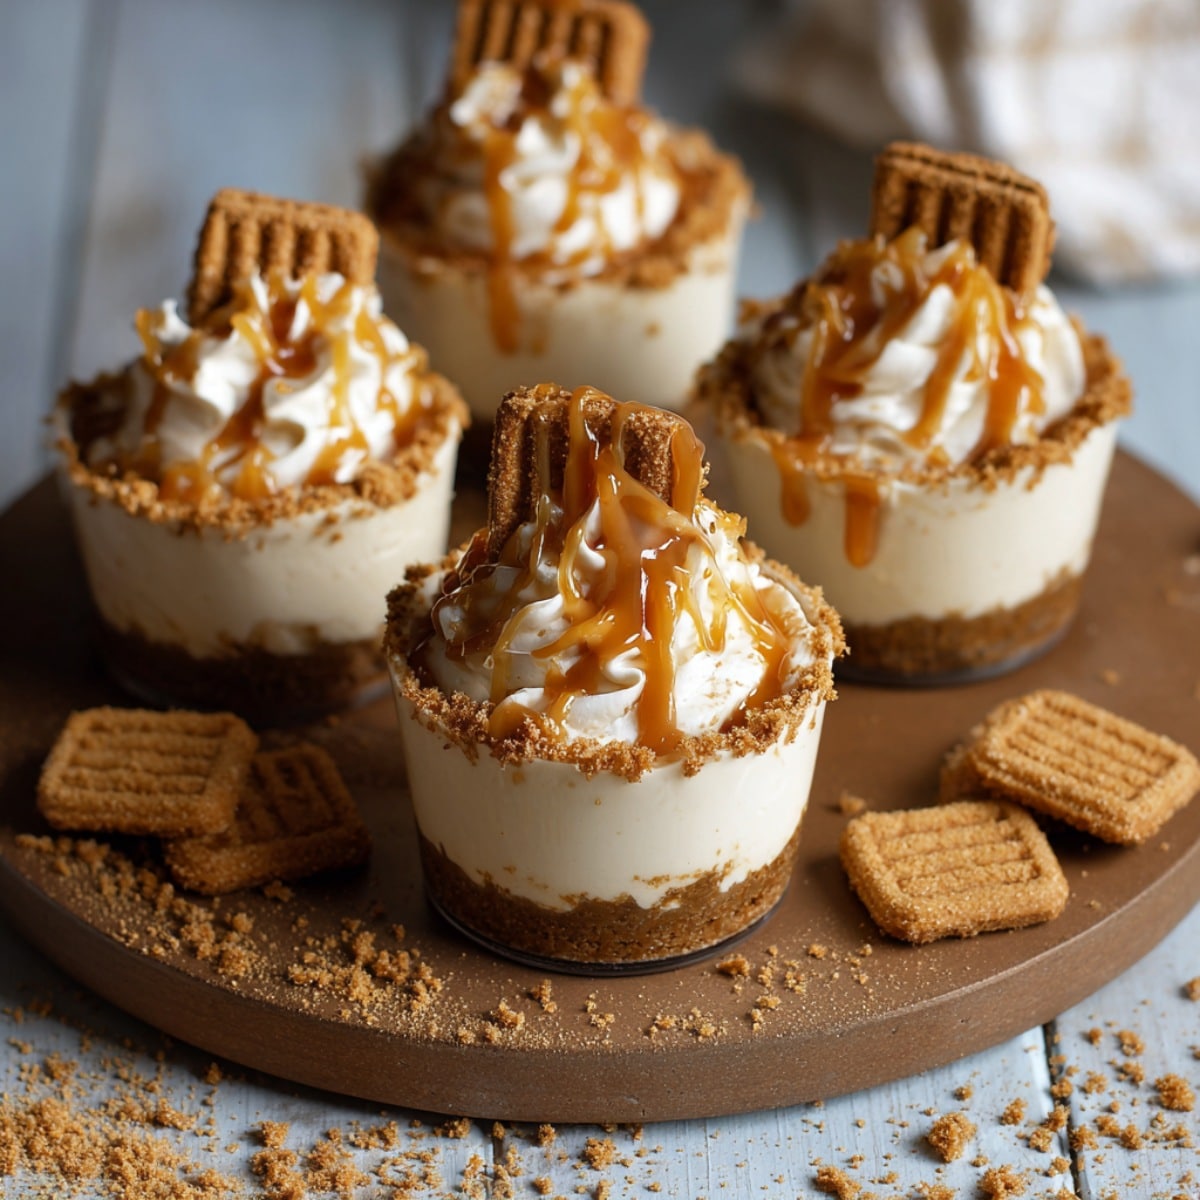
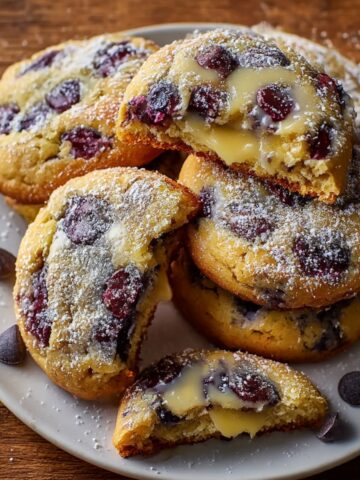
No bake Biscoff cheesecake cups are individual portion desserts featuring Biscoff cookie crust layered with no bake cream cheese filling flavored with cookie butter spread served in small jars or cups creating Instagram worthy presentation without requiring actual baking. Traditional cheesecake bakes in springform pan for hour then cools overnight, but these cups use stabilized cream cheese mixture setting in refrigerator eliminating oven time. The Biscoff cookies also called Lotus cookies or speculoos provide cinnamon spiced flavor that pairs perfectly with tangy cream cheese creating flavor combination that tastes like sophisticated dessert despite no cooking skills required.
How to Make No-Bake Biscoff Cheesecake Cups
What Makes Our Version Special
Using Biscoff cookie butter in the cheesecake filling intensifies cookie flavor beyond just cookie crust making these taste strongly of those addictive airline cookies. We make individual servings in jars or cups which look impressive for parties and control portions better than cutting slices from whole cheesecake. Stabilizing cream cheese mixture with whipped cream creates mousse like texture that sets properly in fridge without gelatin. The layers of crust, cheesecake, and toppings visible through glass jars transform simple no bake dessert into something that photographs well for social media.
No-Bake Biscoff Cheesecake Cups Ingredients
For the Biscoff Cookie Crust:
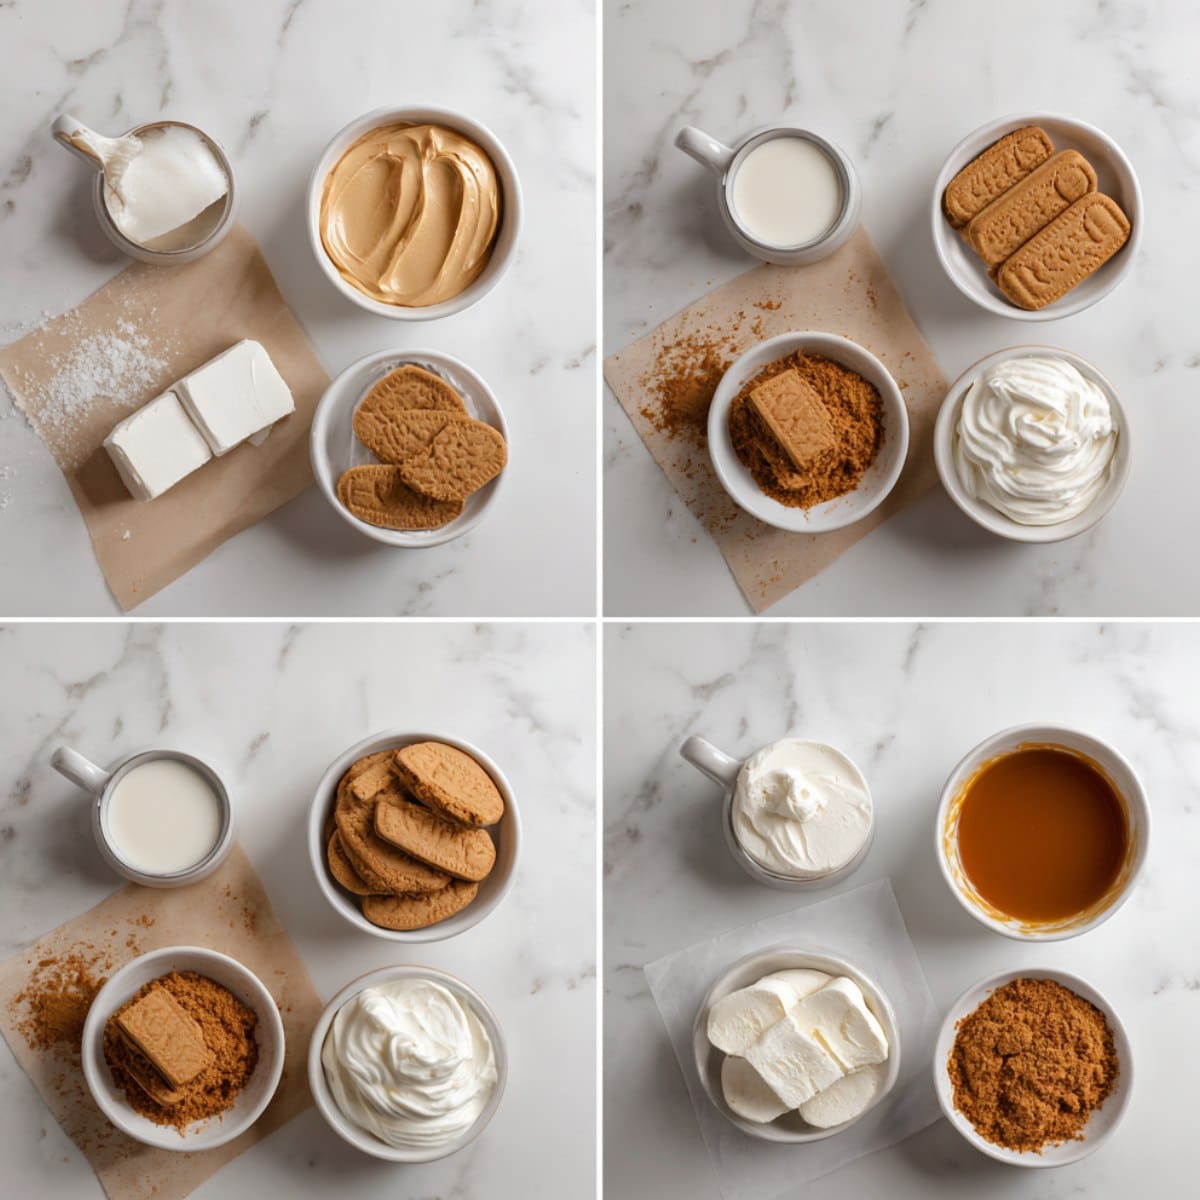
- 2 cups Biscoff cookies crushed (about 20 cookies)
- ¼ cup butter, melted
- 2 tablespoons brown sugar
- Pinch of salt
For the Cheesecake Filling:
- 16 oz cream cheese, softened (2 packages)
- ½ cup Biscoff cookie butter spread
- ½ cup powdered sugar
- 1 teaspoon vanilla extract
- 1 cup heavy whipping cream, cold
- 2 tablespoons powdered sugar for whipping cream
For Topping:
- Whipped cream for topping
- Extra Biscoff cookies for garnish
- Caramel sauce for drizzling
- Cookie crumbs for sprinkling
Step by Step Method
Crush Biscoff Cookies for Crust
- Place Biscoff cookies in food processor or sealed plastic bag
- Pulse or crush with rolling pin until fine crumbs
- Some texture is fine but avoid large chunks
- Measure 2 cups of crumbs after crushing
- Save few whole cookies for garnish
Make Cookie Crust Mixture
- Mix cookie crumbs with melted butter, brown sugar, salt
- Stir until mixture resembles wet sand
- Butter should coat all crumbs evenly
- Press small amount between fingers to test if holds together
- If too dry add more melted butter tablespoon at a time
Layer Crust in Jars
- Divide crust mixture among 6 to 8 small jars or cups
- Press firmly into bottom using spoon or small glass
- Compact crust so it holds together and doesn't crumble
- Aim for even layer about ½ inch thick
- Refrigerate while making filling so crust firms up
Beat Cream Cheese Until Smooth
- Beat softened cream cheese in large bowl until completely smooth
- No lumps should remain or filling will be grainy
- Add Biscoff cookie butter and beat until combined
- Mix in powdered sugar and vanilla extract
- Scrape bowl sides to ensure even mixing
Whip Cream and Fold Into Filling
- In separate bowl whip cold heavy cream with 2 tablespoons powdered sugar
- Beat until stiff peaks form
- Gently fold whipped cream into cream cheese mixture
- Folding rather than mixing maintains airy texture
- Don't overmix or whipped cream deflates
Pipe or Spoon Filling Into Jars
- Transfer cheesecake filling to piping bag or large ziplock with corner cut
- Pipe filling over cookie crust in each jar
- Can also spoon carefully if you don't have piping bag
- Fill jars leaving room for whipped cream topping
- Smooth tops with offset spatula or back of spoon
Refrigerate Until Set
- Cover jars with plastic wrap or lids
- Refrigerate minimum 4 hours or overnight
- Filling needs time to set properly
- Don't skip chilling or filling stays soft and runny
- Can make up to 2 days ahead before adding toppings
Add Toppings Before Serving
- Pipe or dollop whipped cream on top of each cup
- Drizzle with caramel sauce
- Sprinkle with cookie crumbs
- Stick whole Biscoff cookie in whipped cream as garnish
- Toppings make them look bakery quality
What Pairs Well With No-Bake Biscoff Cheesecake Cups?
These rich no bake Biscoff cheesecake cups pair naturally with hot coffee, espresso, or chai tea that complement cookie spice flavors. Serve them at parties alongside other individual desserts like tiramisu cups, parfaits, or trifles. For casual gatherings, pair with fresh fruit, cookies, or brownies that provide variety.
No-Bake Biscoff Cheesecake Cups Variations
3 Ingredient Biscoff Cheesecake Cups
- Use cream cheese, Biscoff cookie butter, and Cool Whip
- Skip homemade whipped cream for store bought
- Simplest version with minimal ingredients
- For people wanting truly easy no bake
Mini Biscoff Cheesecake Bites
- Make in mini cupcake liners instead of jars
- Creates bite sized portions perfect for parties
- Easier to transport than jars
- Can make 24 mini instead of 8 regular
Chocolate Biscoff Cheesecake Cups
- Add melted chocolate to cream cheese mixture
- Creates chocolate version with cookie flavor
- Layer chocolate and vanilla for marble effect
- For chocolate lovers wanting cookie combination
Salted Caramel Biscoff Cups
- Add caramel to filling layer
- Top with sea salt flakes
- Creates sweet salty combination
- More sophisticated flavor profile
Equipment You'll Need
Essential Tools:
- Food processor or rolling pin for crushing cookies
- Electric mixer for beating cream cheese
- Small glass jars or cups for serving
- Piping bag or ziplock bag for filling
- Offset spatula for smoothing
- Plastic wrap for covering
Storage Tips That Keep Them Fresh
Best Fresh
- No bake Biscoff cheesecake cups taste best within first 3 days when crust stays crunchy
- Cream cheese filling maintains best texture before separating
- Whipped cream topping looks freshest first day
Make Ahead Strategy
- Make cheesecake cups without toppings up to 2 days ahead
- Store covered in refrigerator
- Add whipped cream, caramel, cookies right before serving
- Crust and filling can sit longer than toppings
Storing in Refrigerator
- Keep covered in refrigerator up to 5 days
- Store with lids or plastic wrap
- Don't stack or toppings get smashed
- Bring to cool room temperature before serving for best flavor
Top Tips for No-Bake Biscoff Cheesecake Cups
My no bake dessert choice to avoid heating up kitchen ironically created more mess than regular baking would have because individual portions multiplied dirty dishes exponentially. Using room temperature cream cheese is absolutely critical because cold cream cheese creates lumps no amount of beating removes. Don't skip chilling minimum 4 hours thinking you can rush because soft filling slides everywhere when trying to add toppings. The time I tried using low fat cream cheese resulted in filling that never properly set staying runny even after overnight chilling. Piping filling into jars looks neater than spooning but requires more cleanup so choose based on whether you care about appearance or dishes.
No-Bake Biscoff Cheesecake Cups FAQs
How long does a Biscoff cheesecake take to set?
No bake Biscoff cheesecake needs minimum 4 hours refrigeration to set properly, overnight is better. The cream cheese mixture must firm up completely before adding toppings or it stays too soft and messy.
How long to let a no bake cheesecake set?
No bake cheesecakes should chill at least 4 hours, preferably 6 to 8 hours or overnight. Rushing the setting time results in filling that's too soft and doesn't hold shape when serving.
What are common no bake cheesecake mistakes?
Common mistakes include using cold cream cheese creating lumps, not chilling long enough, using low fat cream cheese that doesn't set, overmixing after adding whipped cream deflating mixture, and serving too cold making it taste muted.
Does no bake cheesecake need to be refrigerated after baking?
Yes! Despite name "no bake" these must stay refrigerated always. Cream cheese requires cold storage. Keep refrigerated until serving then return leftovers to fridge immediately. Don't leave out more than 2 hours.
No-Bake Reality Check
The no bake dessert chosen to avoid kitchen heat and complexity created paradoxically more mess through individual jar assembly requiring multiple bowls, piping bags, and containers. Sometimes methods marketed as easier just redistribute effort differently without actually reducing total work. Occasionally traditional oven based approach proves simpler than trendy alternatives that promise convenience but deliver their own unique complications and cleanup requirements.
Ready for more individual desserts? Try our Cannoli Cookies for Italian handheld treats, or explore our Maple Cookies with Brown Butter Icing for fall flavors. For elegant European baking, our French Butter Cake Recipe delivers simple sophistication.
Share your No-Bake Biscoff Cheesecake Cups! Tag us @HannahAndSproutKitchen with #NoBakeBiscoffCheesecakeCups—we're dying to see your jar desserts and hear about your no-bake adventures!
Star⭐️ Rate this No-Bake Biscoff Cheesecake Cups recipe and join our community of dessert makers!
Related
Looking for other recipes like No-Bake Biscoff Cheesecake Cups? Try these:
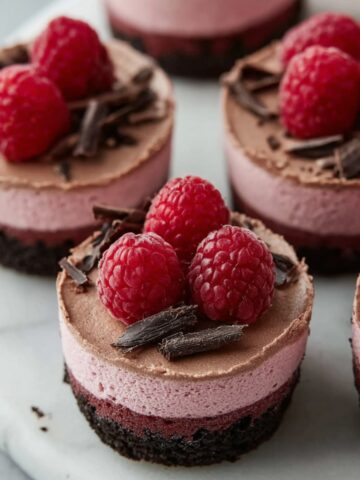
- Raspberry Mousse Delights25 Minutes
- Perfect Peach Bellini Cupcakes45 Minutes
- Marry Me No Bake Raspberry Chocolate Mousse Cups35 Minutes
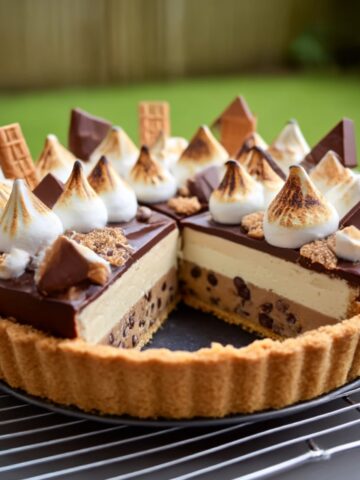
- S’mores Cookie Dough Pie45 Minutes
No-Bake Biscoff Cheesecake Cups
Ingredients
Equipment
Method
- Add whipped cream, caramel, crumbs, and a cookie right before serving.
- Mix Crust: Stir crumbs with melted butter, brown sugar, and salt until it looks like wet sand.
- Pack Layer: Press crust into the bottom of jars; chill while you make filling.
- Beat Smooth: Beat cream cheese until completely smooth. Mix in cookie butter, powdered sugar, and vanilla.
- Whip Cream: Whip cold heavy cream + powdered sugar to stiff peaks.
- Fold Gently: Fold whipped cream into the cream cheese mixture until fluffy.
- Fill Jars: Pipe or spoon filling over crust; smooth tops.
- Chill Set: Cover and refrigerate at least 4 hours (overnight is best).
- Top Serve: Add whipped cream, caramel, crumbs, and a cookie right before serving.

Leave a Reply