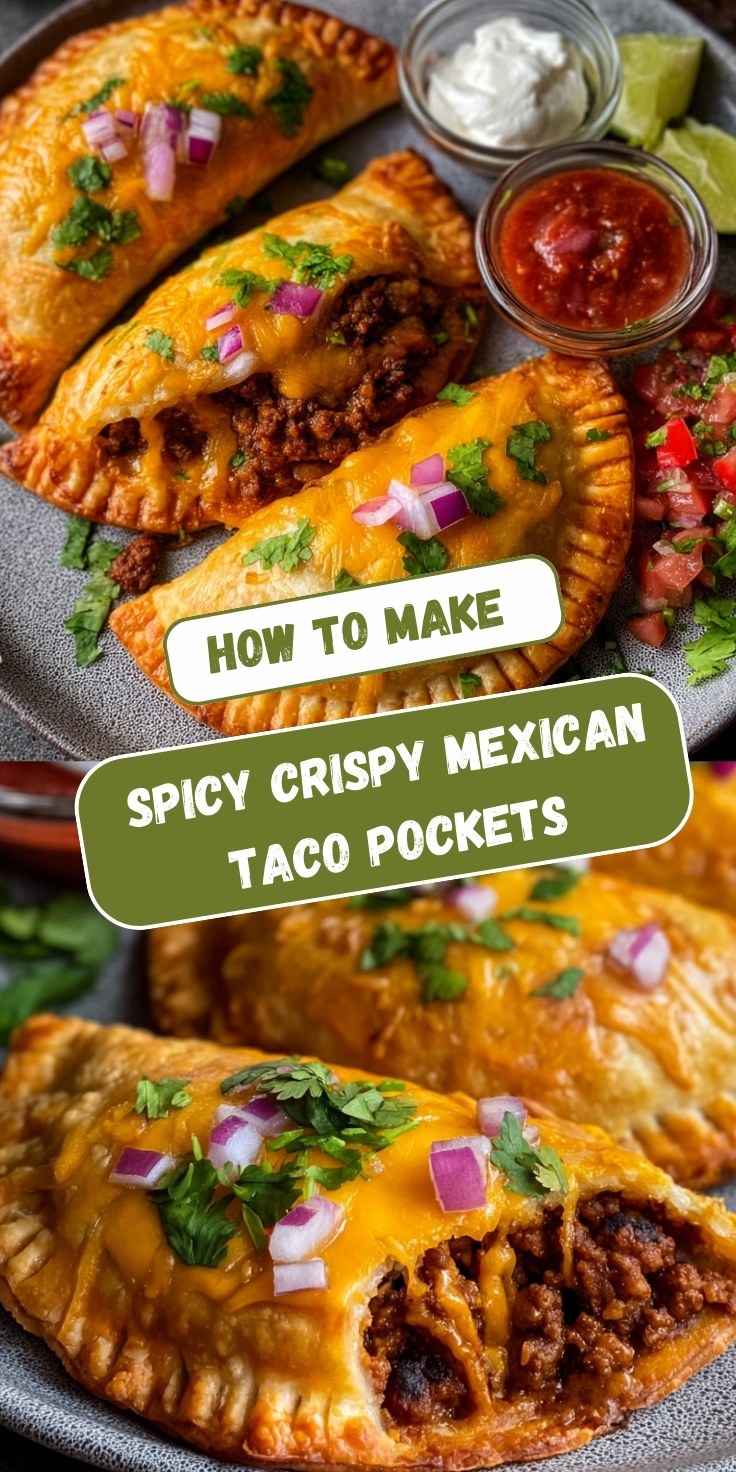
Mom, is it a taco or a spicy pillow?" Max asked, tapping the golden crust with his fork. We spent Tuesday night testing this Spicy Crispy Mexican Taco Pockets recipe, and my kitchen counter was completely covered in flour and cheese. Seeing him happily devour the crunchy, beefy filling while getting salsa everywhere made the messy cleanup totally worth it for our fun family dinner.
Jump to:
Why This Recipe Is Special
Finding comfy food recipes that kids actually want to eat can be exhausting on a busy weeknight. These pockets take classic Mexican dinner night ideas and wrap them up into a neat crunchy shell. It is the perfect handheld meal that feels incredibly rewarding to make together. Sharing that first loud crunch with Max brings so much simple joy to our normal evening routine.
How To Make Spicy Crispy Mexican Taco Pockets
The first time we tried making these, I overfilled the dough and the pockets exploded in the pan. Max laughed hysterically at the flying beef. We quickly learned to use just a spoonful of meat and pinch the edges tightly with a fork. It is a fun little craft project that turns simple ground beef recipes into an exciting crispy dinner.
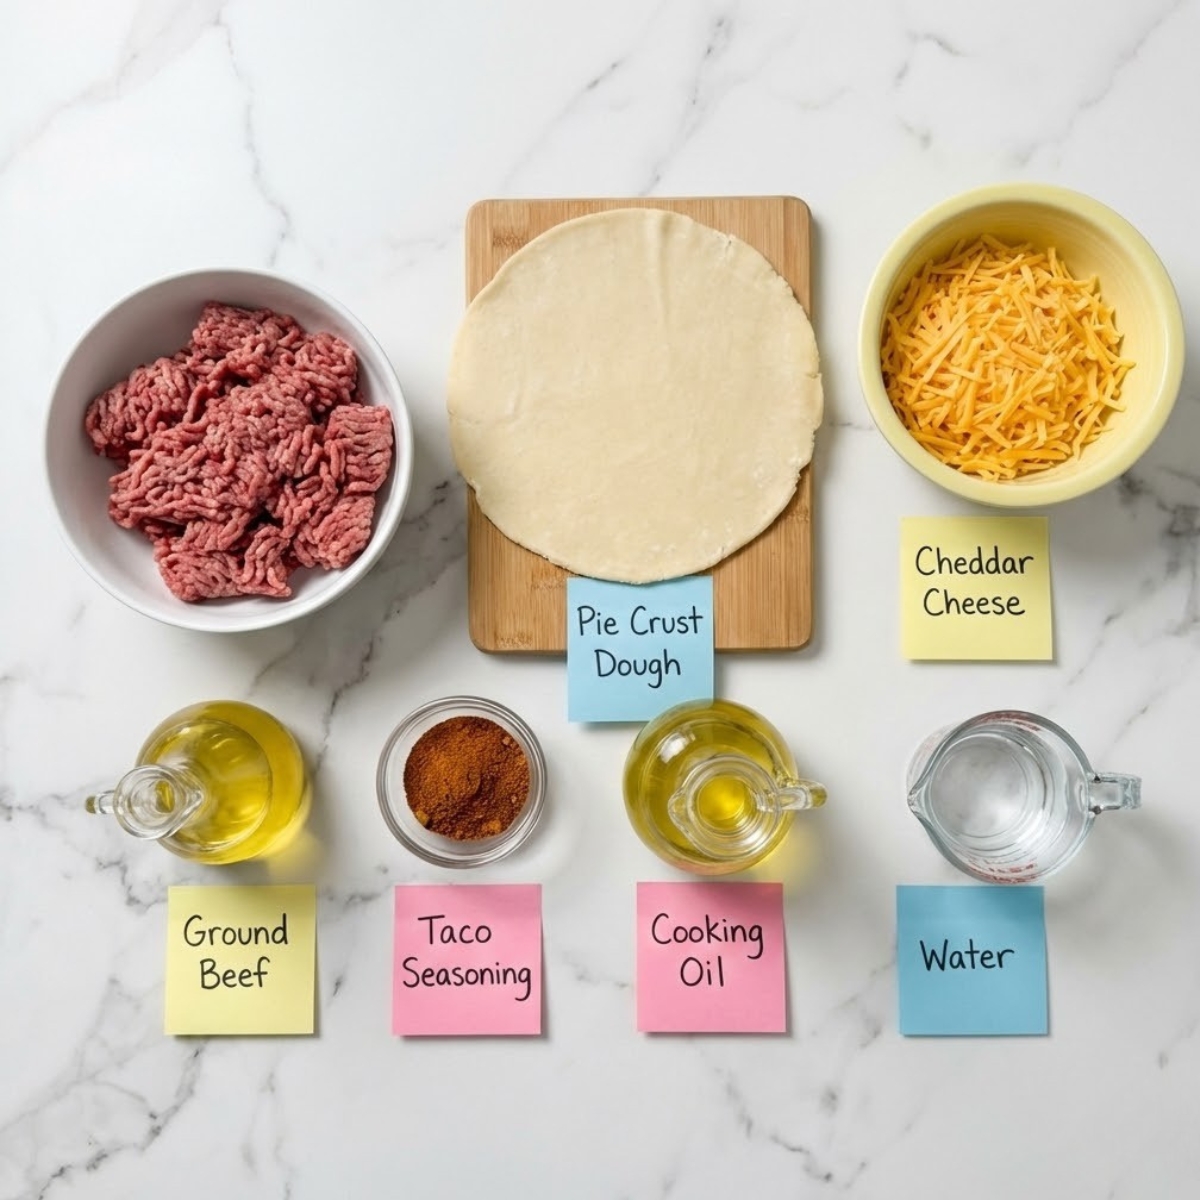
Main Ingredients
- 1 pound ground beef (provides a hearty savory base for the filling)
- 1 packet taco seasoning (adds that classic spicy flavor instantly)
- 1 package refrigerated pie crust or empanada dough (creates the perfectly flaky golden shell)
- 1 cup shredded cheddar cheese (melts beautifully to hold the meat together)
- Cooking oil (used for frying the pockets to get maximum crispy texture)
Step by Step Instructions
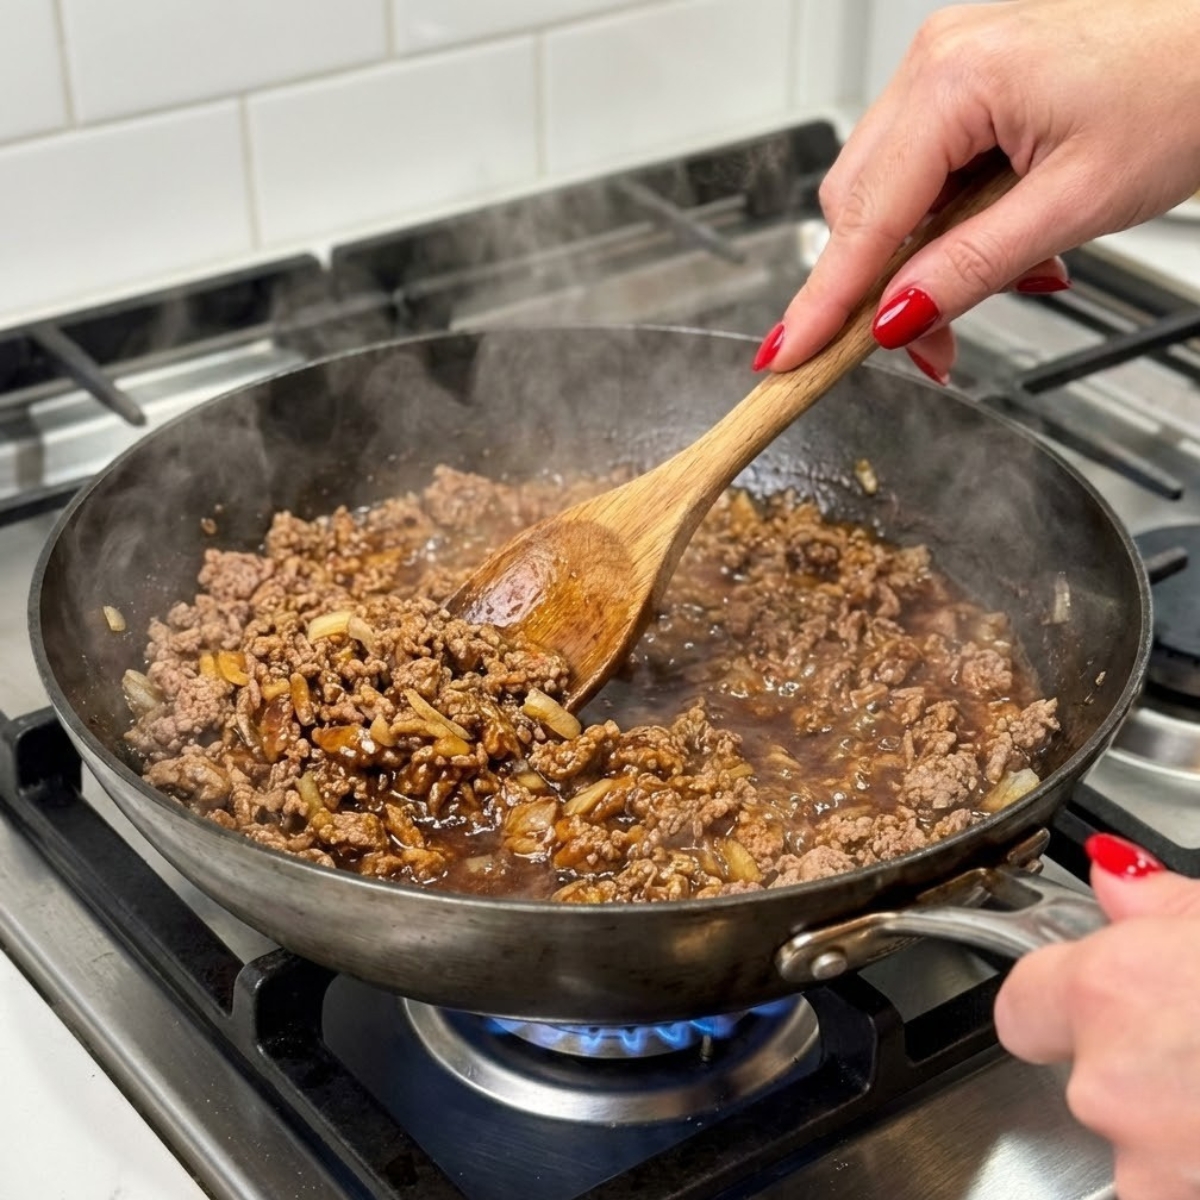
Cook the Beef Filling
- Brown the ground beef in a skillet over medium heat until no pink remains.
- Drain the excess grease from the pan to keep the pockets from getting soggy.
- Stir in the taco seasoning and water according to the packet directions.
- Let the meat simmer until the sauce thickens and coats the beef perfectly.
Prepare the Dough
- Unroll the refrigerated dough onto a lightly floured surface to prevent sticking.
- Cut out four inch circles using a large cookie cutter or the rim of a bowl.
- Gather the dough scraps and gently re roll them to cut out more circles.
- Lay all the flat dough pieces out so they are ready for the filling process.
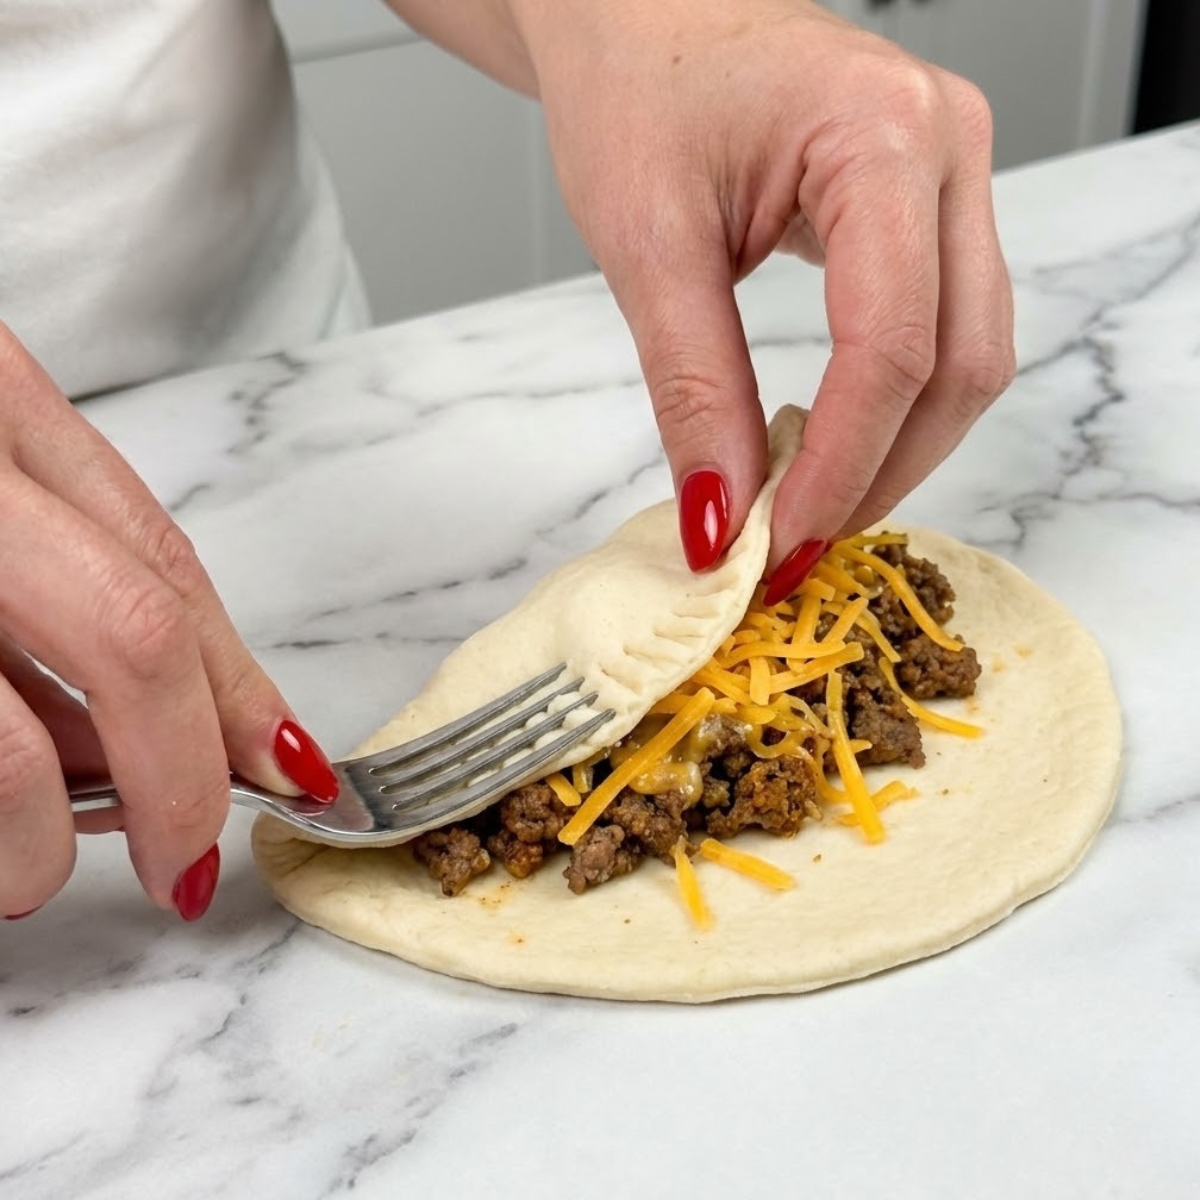
Assemble the Pockets
- Spoon a small amount of the cooled beef mixture into the center of each circle.
- Sprinkle a generous pinch of shredded cheese directly on top of the meat.
- Fold the dough over to create a half moon shape enclosing the filling completely.
- Crimp the edges tightly with a fork so the filling stays securely inside.
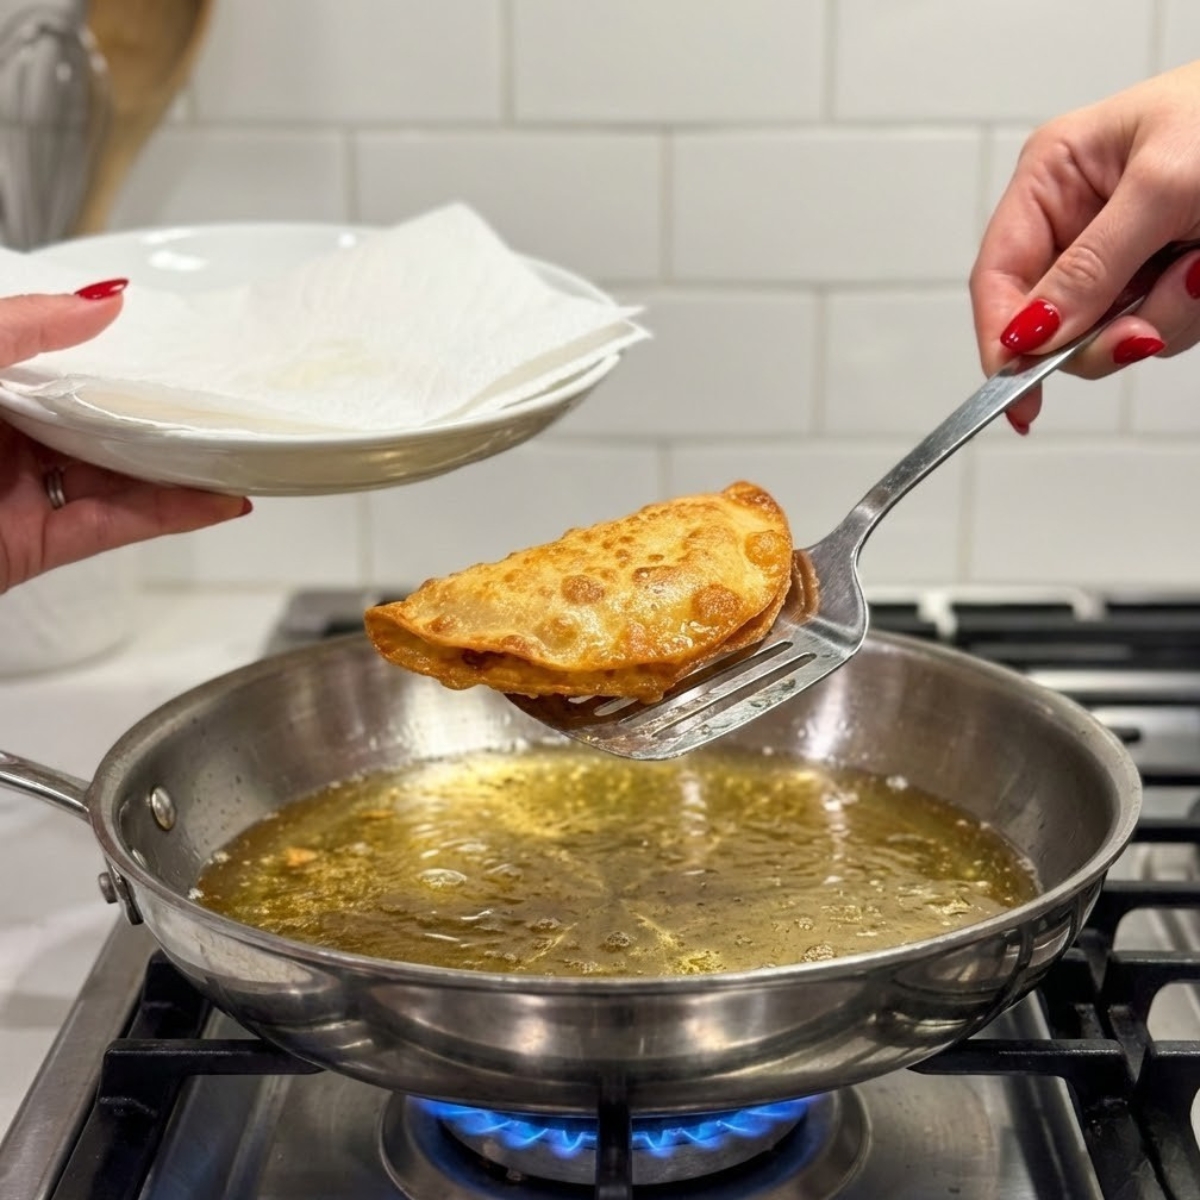
Fry to Perfection
- Heat an inch of cooking oil in a skillet until it shimmers gently.
- Carefully place the pockets into the hot oil without crowding the hot pan.
- Fry for about three minutes per side until they turn a deep golden brown.
- Transfer the cooked pockets to a paper towel lined plate to drain the excess oil.
Spicy Crispy Mexican Taco Pockets Variations
Spicy Crispy Mexican Taco Pockets Air Fryer
- Skip the hot frying oil and place the sealed pockets directly in your air fryer basket.
- Spray them lightly with cooking oil and cook at 375 degrees for twelve minutes until golden.
Cheesy Bean and Corn
- Mix black beans and sweet corn into the beef mixture for extra texture and flavor.
- Max absolutely loves this version because the corn adds a fun sweet crunch to every bite.
Mild Kid Friendly Chicken
- Swap the spicy beef for shredded chicken mixed with mild cheddar cheese.
- This is a great alternative if the original seasoning is a bit too hot for little ones.
Substitutions
- Ground Turkey: You can easily swap the beef for ground turkey if you want a lighter filling without sacrificing any savory flavor.
- Puff Pastry: If you cannot find empanada dough, puff pastry works beautifully and creates an incredibly flaky delicate crust.
- Monterey Jack Cheese: Substitute the cheddar with pepper jack or Monterey Jack for a creamier melt with an extra kick of spice.
- Homemade Seasoning: Use a blend of chili powder, cumin, and garlic powder if you happen to run out of the store bought taco packets.
Equipment
- Large skillet
- Mixing spoon
- Round cookie cutter or small bowl
- Fork
- Slotted spatula
Storage Tips
Make Ahead Strategy
- Assemble the unbaked pockets and place them on a parchment lined baking sheet.
- Store them in the refrigerator covered tightly with plastic wrap for up to one day.
Refrigeration
- Keep leftover cooked pockets in an airtight container in the fridge for up to three days.
- Make sure they are completely cooled before sealing the container to prevent soggy crusts.
Freezing and Reheating
- Freeze the cooked pockets in a single layer before transferring them to a freezer bag.
- Reheat them directly from frozen in the oven at 350 degrees until they are warmed through.
Family Secret Worth Sharing
The secret to the absolute best spicy crispy mexican taco pockets with ground beef is managing the filling temperature. I learned this the hard way when I scooped steaming hot beef directly onto the cold dough. The pastry instantly melted into a sticky mess before I could even fold it. Now, Max is in charge of the cooling process. We spread the cooked taco meat onto a wide plate and he fans it with a magazine until it is room temperature. It sounds silly, but this tiny trick guarantees the dough stays firm and crimps beautifully every single time.
Spicy Crispy Mexican Taco Pockets FAQs
Why did my pockets burst open while cooking?
You likely overfilled them or did not crimp the edges tightly enough. Use less meat than you think you need and press down firmly with a fork to seal the seams securely.
Can I bake these instead of frying them?
Yes, you can brush them with an egg wash and bake them at 400 degrees for about twenty minutes. They will be deliciously flaky, though slightly less crunchy than frying.
What are the best things to make with taco meat leftovers?
These pockets are honestly the perfect solution for leftover taco meat. The meat is already seasoned and cooled, making the assembly process incredibly fast for a quick dinner the next day.
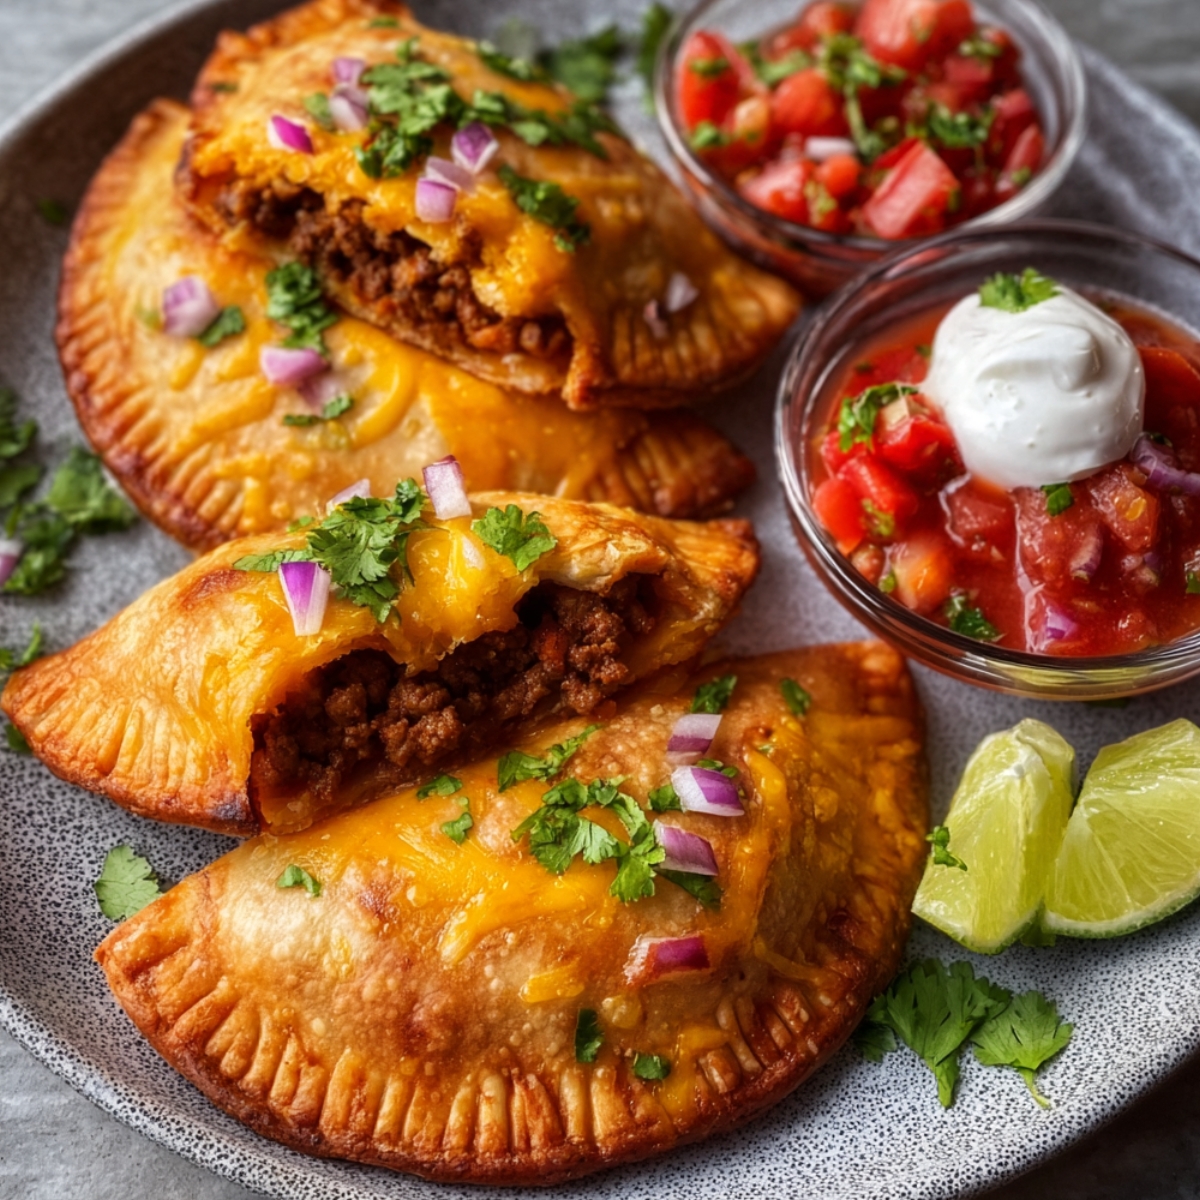
A Crunchy Plate of Joy
As we finally sat down, Max immediately dipped his pocket into a giant puddle of sour cream, taking a massive bite that echoed across the kitchen. Finding fun skillet dinners like this really transforms a regular evening into an event. If you need a break from a Buffalo Chicken Mac and Cheese or want something different than a Sweet and Spicy Honey Pepper Chicken with Creamy Mac and Cheese, these pockets hit the spot perfectly. They are almost as fun to eat as my Carbone Spicy Rigatoni Recipe, but entirely handheld.
Don't forget to snap a picture of your Spicy Crispy Mexican Taco Pockets before that first bite disappears (trust me, it will disappear quickly!), and leave a rating below. We'd love to hear how this Spicy Crispy Mexican Taco Pockets becomes part of your dinner story. Star Rate this recipe and join our kitchen family! +2
Related
Looking for other recipes like Spicy Crispy Mexican Taco Pockets? Try these:
- Cheesy Chicken Spinach Casserole40 Minutes
- White Sauce Pizza with Creamy Garlic Bliss32 Minutes
- Smoked Sausage and Potato Bake45 Minutes
- Honey Lime Chicken Avocado Rice Stack35 Minutes


Spicy Crispy Mexican Taco Pockets
Ingredients
Equipment
Method
- Brown the ground beef in a skillet over medium heat until no pink remains to ensure the meat is fully cooked.
- Drain the excess grease from the skillet so the taco pockets do not become overly greasy or soggy inside.
- Stir in the taco seasoning and water, letting it simmer until the sauce thickens and coats the beef perfectly.
- Unroll the refrigerated dough and cut out four inch circles using a large cookie cutter to create the shells.
- Spoon a small amount of the cooled beef mixture and shredded cheese into the center of each dough circle.
- Fold the dough over to create a half moon shape and crimp the edges tightly with a fork.
- Heat cooking oil in a skillet and carefully fry the pockets for three minutes per side until golden brown.
- Transfer the cooked pockets to a paper towel lined plate to drain the excess oil before serving warm.


Leave a Reply