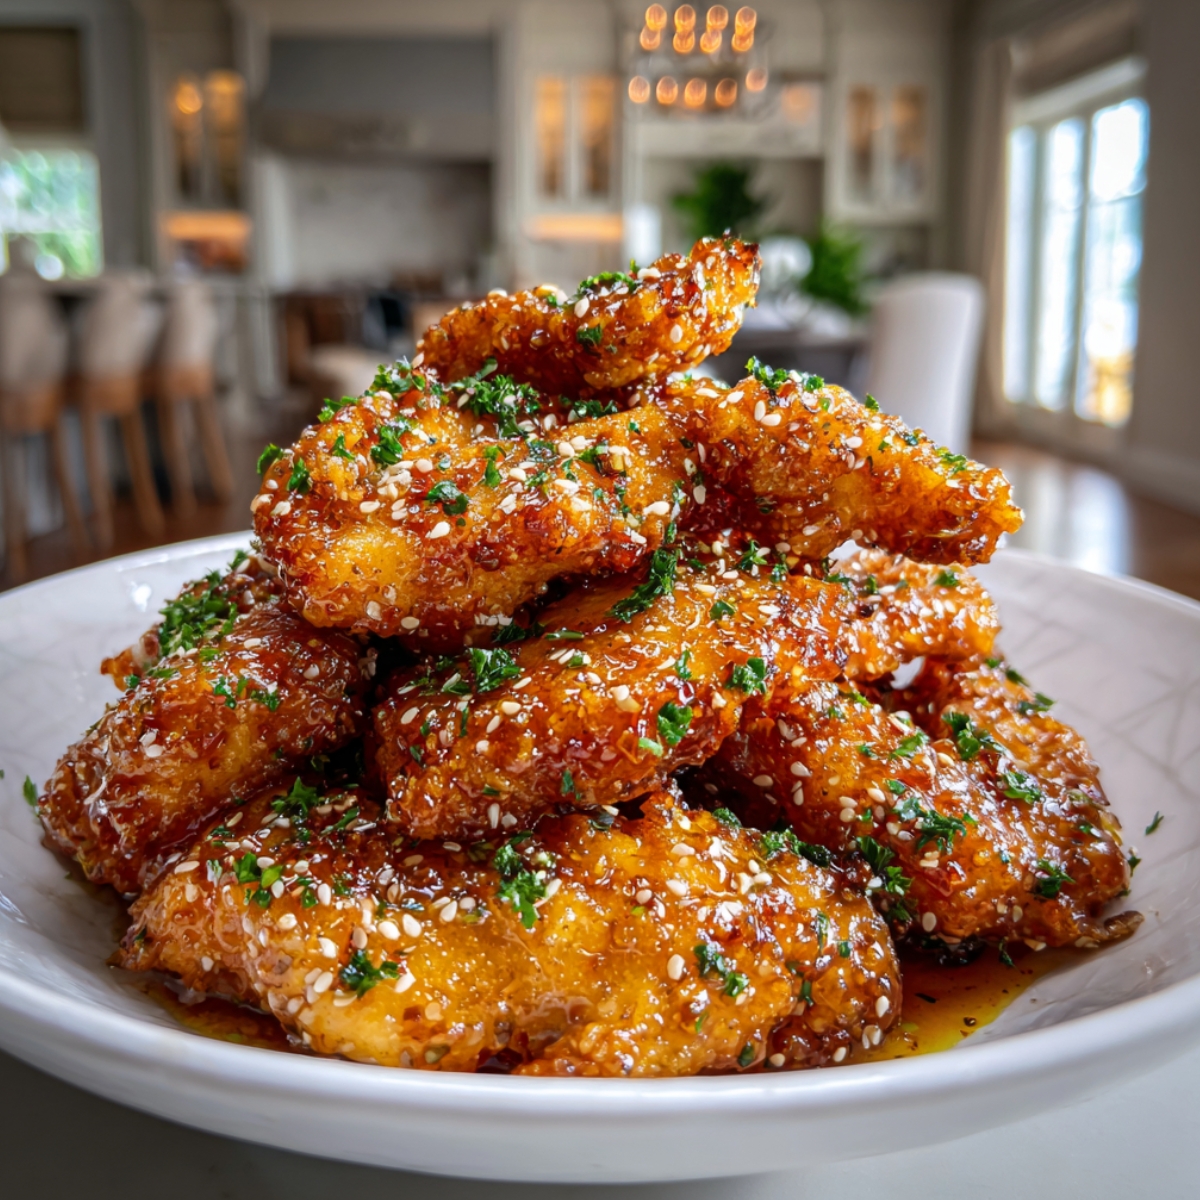
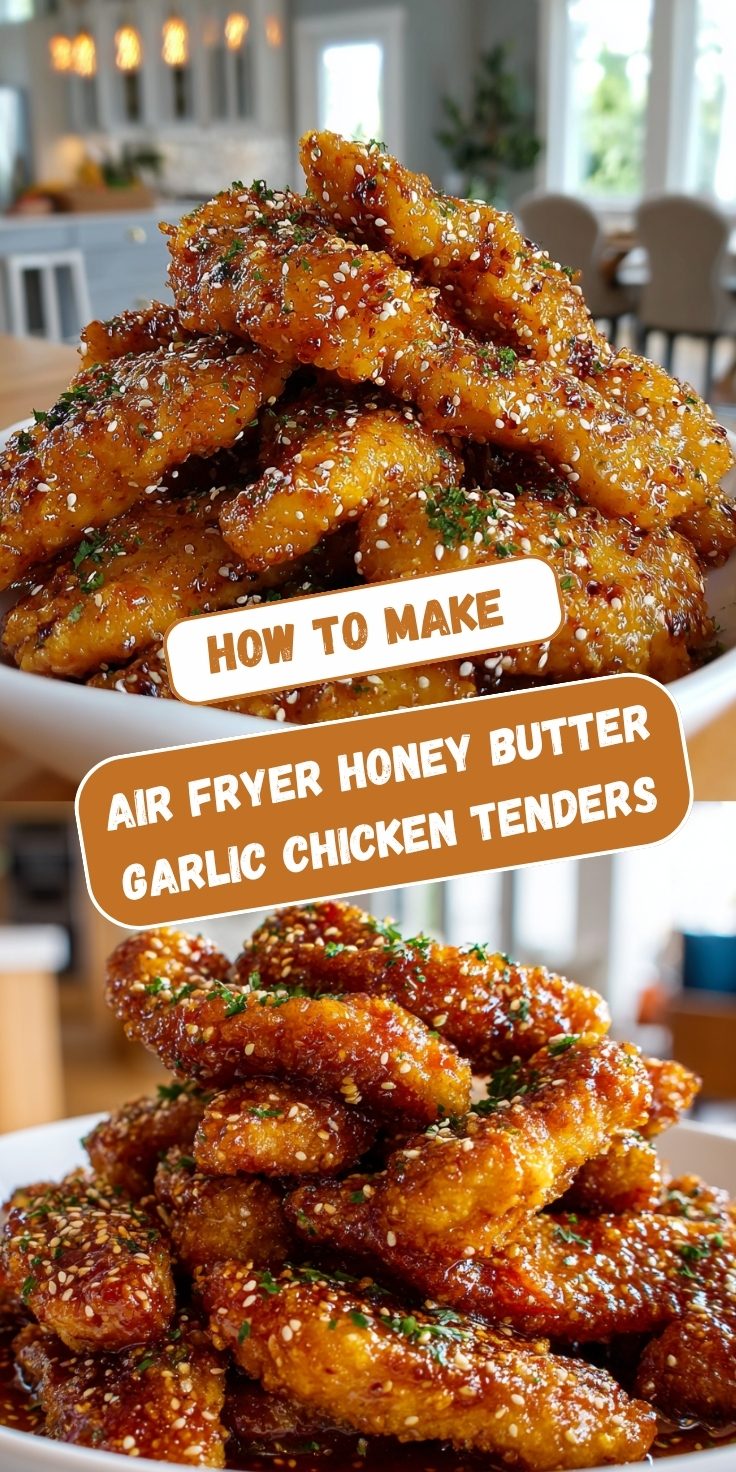
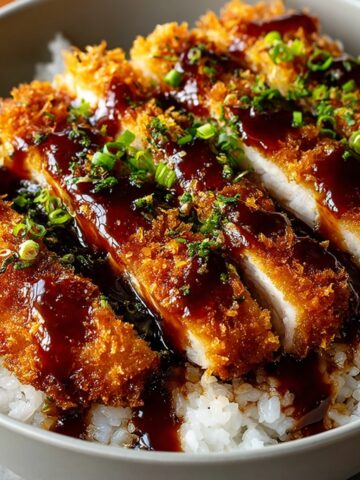
Max walked into the kitchen, leaned over the plate, and said "what is on those?" Every single tender was glazed in a sticky honey butter sauce, scattered with sesame seeds and black pepper, and piled high enough that the stack was practically a mountain. Making Air Fryer Honey Butter Garlic Chicken Tenders for the first time produced a plate that looked exactly like the image and disappeared from the table before I had found a fork.
Jump to:
- Why This Recipe Is Special
- How To Make Air Fryer Honey Butter Garlic Chicken Tenders
- Air Fryer Honey Butter Garlic Chicken Tenders Variations
- Substitutions
- Equipment
- Storage Tips
- Family Secret Worth Sharing
- Air Fryer Honey Butter Garlic Chicken Tenders FAQs
- The Plate That Stopped the Room
- Related
- Air Fryer Honey Butter Garlic Chicken Tenders
Why This Recipe Is Special
These tenders earn their place because the air fryer does something the oven cannot match in the same time. The outside of each tender develops a slightly caramelized, sticky glaze from the honey butter sauce hitting the circulating heat, and the inside stays juicy without any of the oil required for deep frying.
Max said after the first bite that these were "the kind of thing you order at a restaurant and then wonder why you went out." That is the correct response to a plate of honey butter garlic tenders that looks exactly like the image.
How To Make Air Fryer Honey Butter Garlic Chicken Tenders
The first time I made these I tossed the tenders in the sauce before air frying and the honey caramelized too fast against the basket and the exterior burned before the interior was cooked through. Max tasted one and said "the outside is very committed but the inside is not ready yet." He was accurate.
Once I understood that the tenders need to cook through first and the honey butter garlic sauce goes on in the final two minutes of cooking rather than at the start, the glaze caramelizes perfectly in the remaining heat without burning and the chicken finishes juicy all the way through.
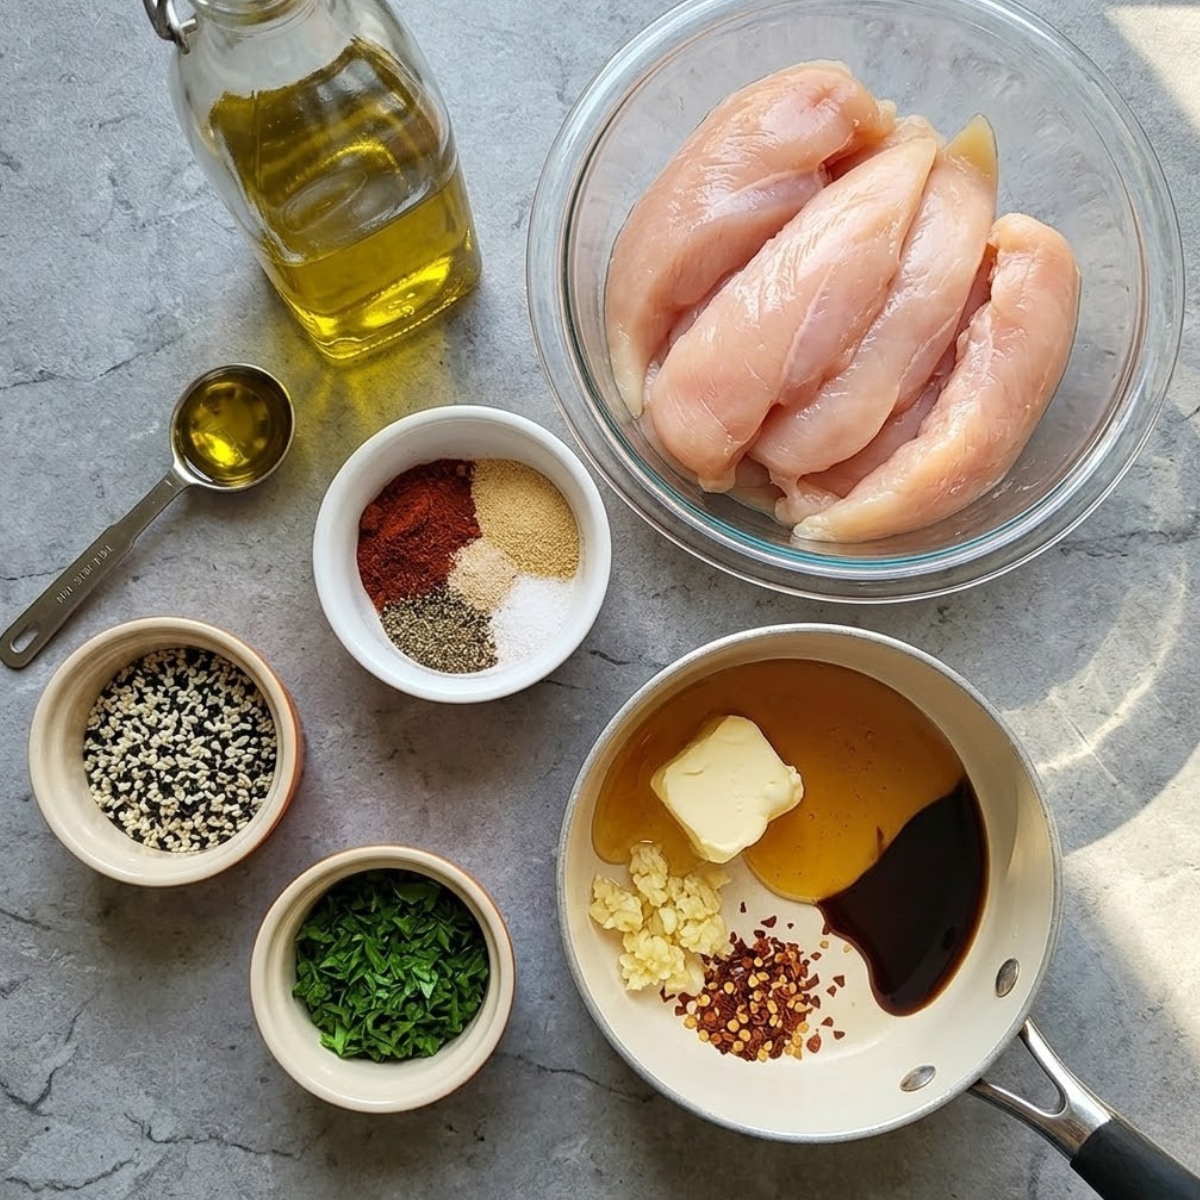
Main Ingredients
- 1.5 lbs chicken tenderloins — the natural tenderloin cut produces the elongated, irregularly shaped pieces visible in the pile in the image; they cook faster than thicker cuts and stay juicy in the air fryer at high heat
- 2 tablespoon olive oil — tossed with the chicken before the first cook so the surface crisps and takes on color before the glaze is added
- 1 teaspoon smoked paprika — the warm, slightly smoky seasoning visible in the deep amber color of the tenders before the sauce is applied
- 1 teaspoon garlic powder — seasons the chicken from the first cook so the garlic flavor runs through the meat as well as coating the outside from the sauce
- ½ teaspoon onion powder — adds a subtle savory depth to the seasoning base
- ½ teaspoon black pepper — the visible black pepper flecks throughout the surface of the finished tenders in the image
- ½ teaspoon salt — seasons the chicken through the initial cook
- For the honey butter garlic sauce: 3 tablespoon unsalted butter, 3 tablespoon honey, 4 garlic cloves minced, 1 teaspoon soy sauce, ½ teaspoon chili flakes — the glossy, sticky sauce that coats every tender in the image and creates the caramelized, lacquered surface visible throughout the pile
- 2 tablespoon sesame seeds — the white and dark sesame seeds visible scattered across every tender in the image; added on top of the sauce during the final two minutes so they toast slightly without burning
- 2 tablespoon fresh parsley or cilantro, finely chopped — the bright green herb flecks scattered across the top of the pile in the image; added immediately after the tenders come out of the air fryer so the heat from the chicken softens the herbs slightly
Step-by-Step Instructions
Step 1 — Season and Prep the Tenders
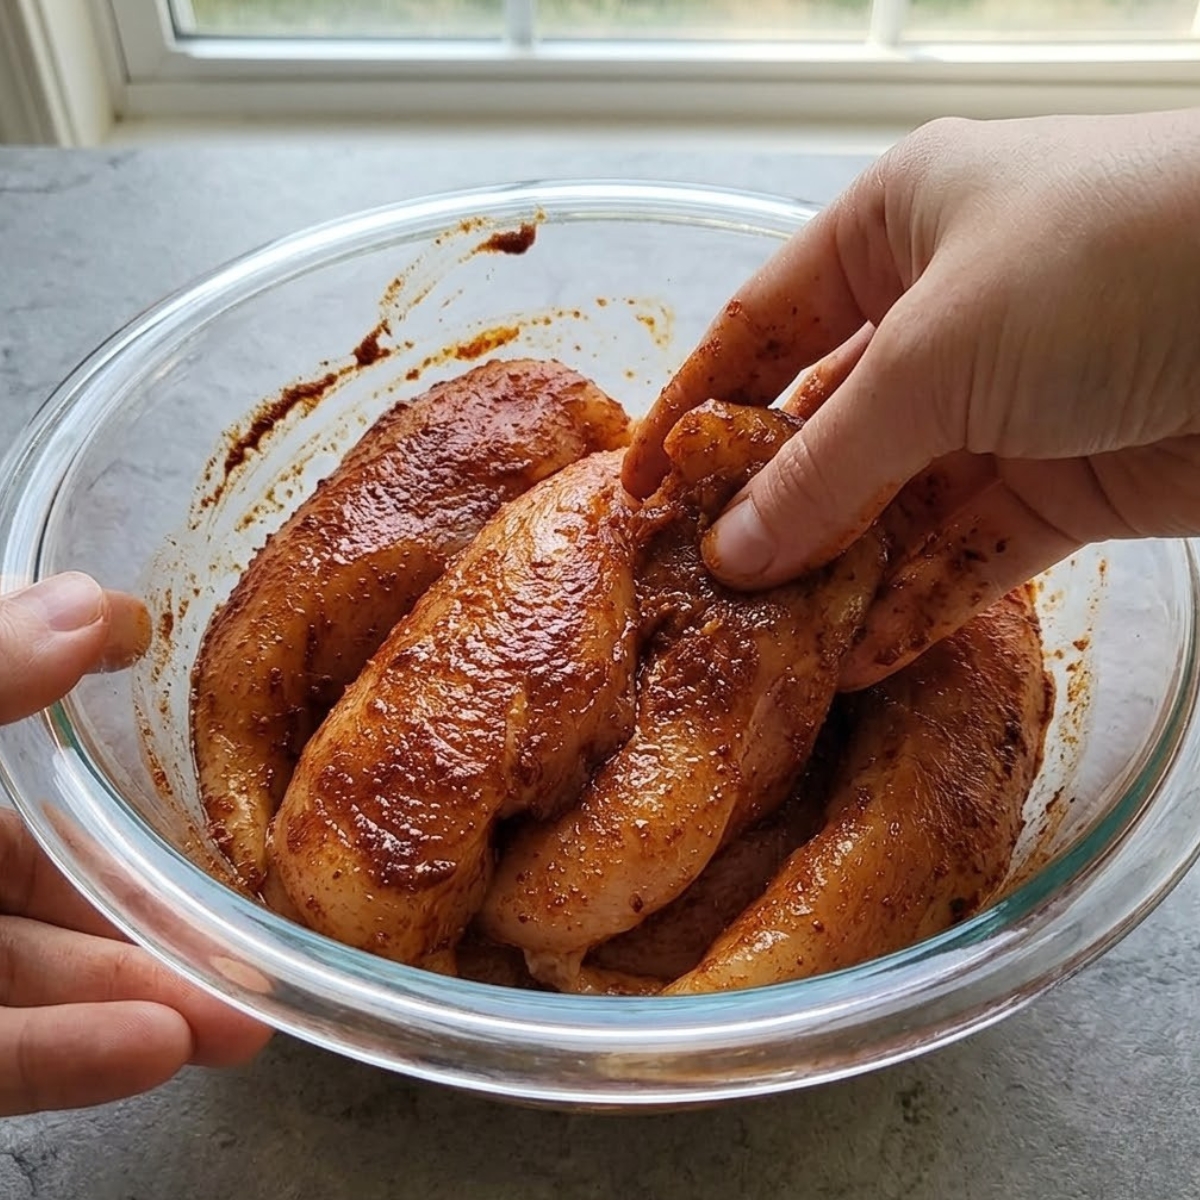
- Pat the chicken tenderloins completely dry with paper towels so the seasoning and oil adhere to the surface without the moisture creating steam in the air fryer basket during cooking
- Combine the olive oil, smoked paprika, garlic powder, onion powder, black pepper, and salt in a large bowl and whisk until the oil and seasonings form a uniform paste
- Add the chicken tenderloins and toss until every surface is evenly coated, making sure to turn each piece and coat the underside and any folds in the meat
- Let the seasoned chicken rest at room temperature for 10 minutes while you prepare the honey butter garlic sauce and preheat the air fryer
Step 2 — Make the Honey Butter Garlic Sauce
- Melt the butter in a small saucepan over medium-low heat and add the minced garlic, stirring for 60 seconds until fragrant and just beginning to soften without turning brown
- Add the honey, soy sauce, and chili flakes to the garlic butter and stir over low heat for 1 to 2 minutes until the honey has fully dissolved into the butter and the sauce is smooth, glossy, and uniform
- Remove from heat and set aside; the sauce should be warm and pourable rather than set or thick when it goes onto the hot chicken in the final minutes of air frying
- Taste the sauce and adjust the honey for more sweetness, soy sauce for more savory depth, or chili flakes for more heat before using it on the chicken

Step 3 — Air Fry the Chicken
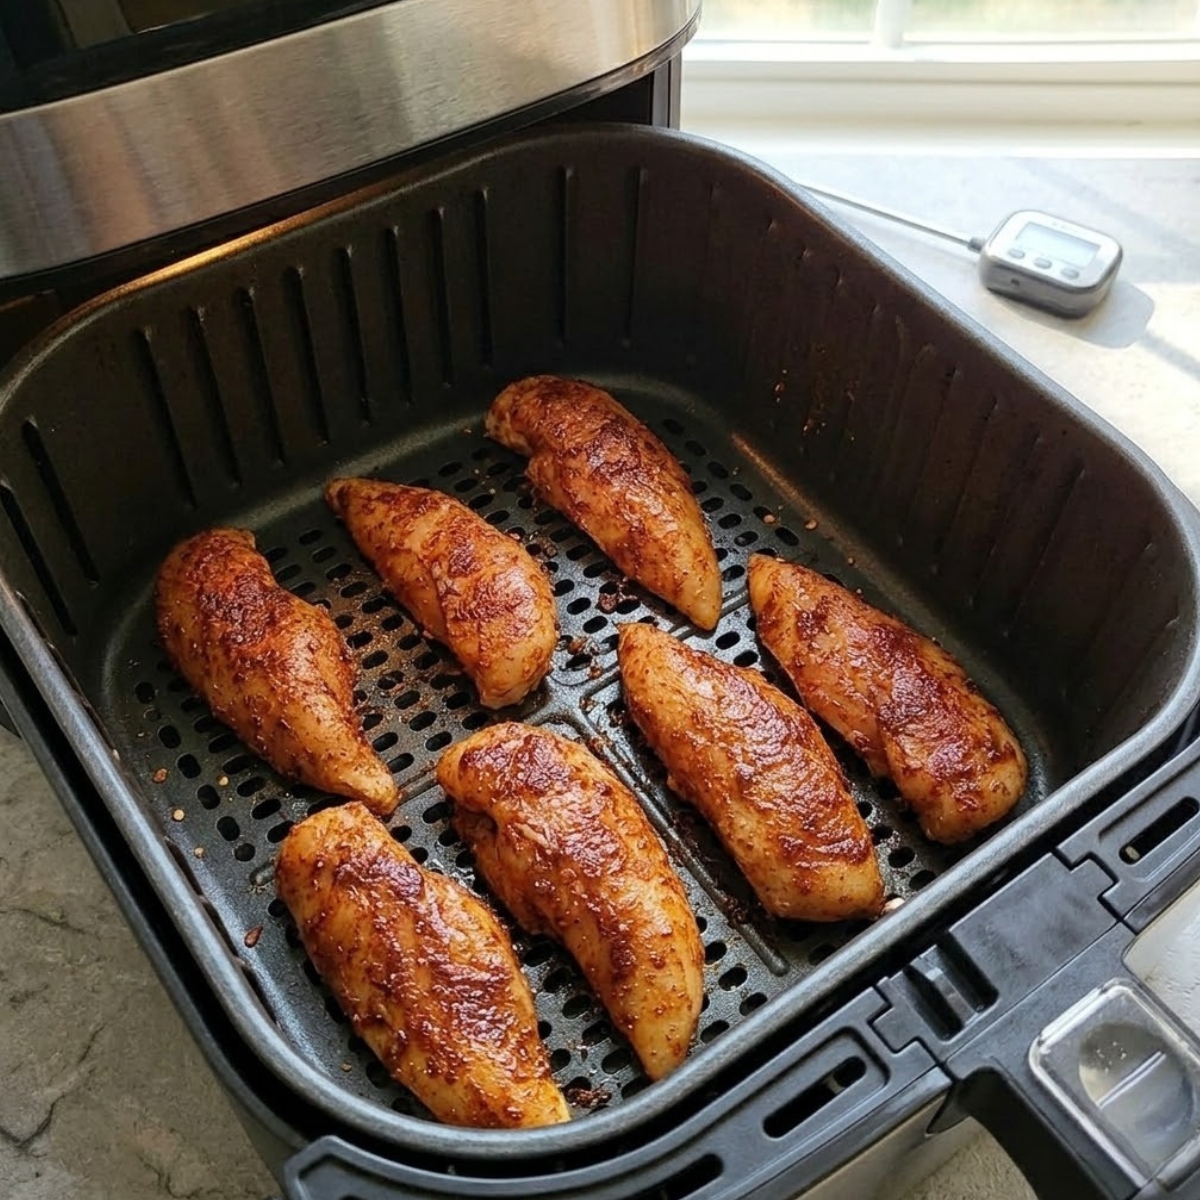
- Preheat the air fryer to 400°F for 3 to 5 minutes so the basket is genuinely hot before the chicken goes in, which produces a better initial crust than placing the chicken in a cold basket
- Arrange the seasoned chicken tenderloins in a single layer in the air fryer basket without overlapping so the circulating air reaches every surface of each piece; cook in two batches if needed
- Air fry for 8 to 10 minutes, flipping each tender once halfway through at the 4 to 5 minute mark, until the exterior is golden and the internal temperature reads 160°F on a meat thermometer
- Check the temperature at the thickest part of the largest tender since the thinner pieces will be done first; pull any fully cooked pieces and keep them warm while the thicker ones finish
Step 4 — Glaze and Finish
- Brush or spoon the honey butter garlic sauce generously over each tender while they are still in the air fryer basket so the sauce covers every visible surface
- Return the glazed basket to the air fryer and cook at 400°F for 2 to 3 more minutes until the honey sauce bubbles, caramelizes, and sets into the sticky, lacquered coating visible across the surface of every tender in the image
- Remove the basket and immediately scatter the sesame seeds over the hot tenders so they embed slightly into the sticky sauce rather than sitting loosely on the surface
- Transfer the glazed tenders to a white plate, pile them high as shown in the image, and scatter the fresh chopped parsley or cilantro generously over the top before serving immediately while the sauce is still warm and glossy
Air Fryer Honey Butter Garlic Chicken Tenders Variations
Extra Crispy Air Fryer Honey Butter Garlic Chicken Tenders
- Add a light coating of cornstarch to the seasoned chicken before air frying by tossing each piece in 2 tablespoons of cornstarch alongside the oil and seasonings so a thin starchy layer forms on the outside of each tender
- The cornstarch creates a crisper, more textured exterior that holds the honey butter glaze better than a plain surface and produces slightly more caramelization on the visible edges of each piece
- Increase the initial air fry temperature to 410°F for the first cook stage to drive more moisture from the cornstarch coating before the glaze is applied in the final two minutes
- Max considers the cornstarch version significantly better and considers its absence from the original recipe a personal oversight that he corrects every time he makes these himself
Honey BBQ Chicken Tenders Air Fryer Version
- Replace 1 tablespoon of the honey in the sauce with 1 tablespoon of your preferred barbecue sauce for a smoky, tangy variation that adds a deeper, more complex flavor to the glaze
- Increase the smoked paprika in the initial seasoning to 1.5 teaspoons so the smoky note runs through the meat as well as the sauce
- Finish with a drizzle of extra barbecue sauce over the plated tenders rather than the parsley so the visual has the same glossy, sauced appearance as the original
- This version is Max's preference for evenings when he wants something that tastes more like a cookout and less like a restaurant appetizer
Crispy Honey Garlic Chicken Bites
- Cut the chicken tenderloins into bite-sized pieces before seasoning so the finished result is individual nugget-sized pieces rather than full tenders
- Reduce the initial cook time to 6 to 7 minutes since the smaller pieces cook faster and can overcook quickly at 400°F if left the full 10 minutes
- The bite-sized version is ideal for a sharing plate at a gathering where individual forks are impractical and the glossy honey garlic coating works just as well on smaller pieces as it does on the full tenders
Substitutions
Chicken tenderloins substitute: Boneless skinless chicken breast cut into strips of similar width replaces tenderloins and produces nearly the same result with a slightly less tender texture since breast meat has less intramuscular fat than the tenderloin. Cut them to approximately 1 inch wide and 4 inches long so they cook in the same time as natural tenderloins.
Honey substitute: Maple syrup replaces honey in equal amounts and produces a slightly more complex, less floral sweetness that pairs well with the garlic butter and soy sauce. Agave nectar also works and has a more neutral sweetness that lets the garlic flavor dominate the sauce flavor more than honey does.
Butter substitute: Ghee replaces butter in equal amounts for a slightly nuttier, dairy-free alternative with a higher smoke point that handles the high air fryer heat without separating or burning during the final glaze stage. The flavor is very close to butter with a slightly more caramelized note.
Soy sauce substitute: Tamari or coconut aminos replace soy sauce in equal amounts. Coconut aminos are slightly sweeter and less salty than soy sauce, which works naturally in a honey-based sauce; reduce the honey by half a teaspoon if using coconut aminos to compensate for the additional sweetness.
Equipment
- Air fryer (any size; cook in batches if needed)
- Small saucepan for the honey butter garlic sauce
- Large bowl for seasoning the chicken
- Pastry brush or spoon for applying the glaze
- Instant-read meat thermometer
- White serving plate for the presentation in the image
- Tongs for flipping the tenders during cooking
Storage Tips
Make Ahead Strategy
- Season the chicken tenderloins up to 24 hours ahead and store covered in the refrigerator so the seasoning penetrates the meat and the first cook stage takes only the air frying time
- Make the honey butter garlic sauce up to 3 days ahead and store in a sealed jar in the refrigerator; reheat gently in a small saucepan over low heat until pourable before brushing onto the hot chicken
- Do not glaze the tenders ahead of serving since the honey sauce sets and loses its glossy appearance during refrigeration
Refrigeration
- Store leftover glazed tenders in an airtight container in the refrigerator for up to 3 days
- Reheat in the air fryer at 375°F for 3 to 4 minutes until the glaze is warm and glossy again; avoid the microwave since it makes the exterior soggy and the sauce watery rather than sticky
- The flavor of the honey garlic sauce actually deepens slightly overnight as the garlic and honey settle into the surface of the chicken
Freezing
- Freeze the cooked but unglazed tenders in a single layer on a parchment-lined tray until solid, then transfer to a sealed freezer bag for up to 2 months
- Reheat from frozen in the air fryer at 375°F for 8 to 10 minutes until the internal temperature reaches 165°F, then apply the freshly made honey butter garlic sauce and finish for 2 minutes as the original recipe instructs
- Do not freeze the glazed tenders since the honey sauce changes texture permanently during freezing and the glossy appearance in the image cannot be restored after thawing
Family Secret Worth Sharing
The two-stage cooking method in this recipe came from the same principle my mother applied to almost every glazed meat she made: cook the protein first, glaze last. She said putting a sweet sauce on raw meat at the start of cooking is how you end up with something charred on the outside and raw in the middle, and that patience is the most undervalued skill in a kitchen. She was talking about a baked ham when she first said it, but I applied it to these tenders the second time I made them and the difference was immediate and obvious. Max watched me apply the sauce in the final two minutes rather than at the start and said "so the sauce isn't scared of the chicken anymore." That is an unusually poetic way to describe the correct technique. He was right, as usual.
Air Fryer Honey Butter Garlic Chicken Tenders FAQs
How do I make these air fryer honey butter garlic chicken tenders extra crispy?
Two adjustments produce a significantly crispier result. First, add 2 tablespoons of cornstarch to the seasoning mix before tossing the chicken so a light starchy coating forms on every surface and crisps against the air fryer heat. Second, make sure the chicken is completely dry before seasoning since any surface moisture creates steam inside the basket and prevents the exterior from developing a crust. Cooking in a single uncrowded layer rather than stacking the pieces also makes a substantial difference to the final crispiness.
What temperature should I air fry chicken tenders?
400°F is the right target for the first cook stage since it is hot enough to develop the golden color on the exterior and cook the interior through in 8 to 10 minutes without drying the chicken out. The final glaze stage also runs at 400°F for 2 to 3 minutes which is just enough heat to caramelize the honey sauce without burning it. Avoid temperatures above 410°F for the glaze stage since honey burns quickly at high heat and the caramelized surface can shift from glossy to charred within a single minute.
What is the best way to get the sauce to stick to the chicken tenders?
Apply the sauce when the chicken is at its hottest, immediately after the first cook stage while it is still in the air fryer basket. The hot surface of the chicken opens the pores slightly and the sauce absorbs into the exterior rather than sitting as a separate liquid layer. Return the glazed chicken to the air fryer immediately after brushing so the heat sets the sauce against the surface in the final 2 to 3 minutes. Sauce applied to cold or room-temperature chicken does not caramelize the same way and slides off rather than bonding with the cooked surface.
The Plate That Stopped the Room
Max sat down, looked at the pile of glazed tenders on the white plate with the sesame seeds and herbs across every surface, and did not say anything for about five seconds. Then he picked up the largest one from the top of the pile and took a bite into the sticky honey garlic exterior and the juicy interior and said "okay, this is the one." Not the best one. The one. As in the recipe that sets the standard. That is what this plate produces every time and it takes twenty minutes from start to finish.
If you are building a chicken collection where every recipe earns that kind of response, Garlic Butter Chicken with Asparagus brings that same golden, buttery chicken energy in a one-pan format with lemon sauce that makes the entire kitchen smell like an occasion. Grilled California Avocado Chicken takes the dinner plate in a completely different direction with fresh avocado, mozzarella, and balsamic glaze that earns the table pause before anyone picks up a fork. And for a deeply spiced, sauce-forward chicken that impresses differently than anything in the air fryer category, Turkish Chicken with Creamy White Sauce is the recipe this kitchen reaches for when the evening calls for something genuinely unexpected.
Don't forget to snap a picture of your Air Fryer Honey Butter Garlic Chicken Tenders before that first tender disappears (trust me, it will disappear quickly!), and leave a rating below. We'd love to hear how this recipe becomes part of your dinner story.
Star rate this recipe and join our kitchen family!
Related
Looking for other recipes like Air Fryer Honey Butter Garlic Chicken Tenders? Try these:
- Thai Red Curry Noodle Soup30 Minutes
- Philly Cheesesteak Quesadilla20 Minutes
- Honey Garlic Kielbasa Veggies25 Minutes
- Zesty Lemon Butter Fish Fillet20 Minutes


Air Fryer Honey Butter Garlic Chicken Tenders
Ingredients
Equipment
Method
- Pat the chicken tenderloins completely dry with paper towels, then toss with olive oil, smoked paprika, garlic powder, onion powder, black pepper, and salt until every surface is evenly coated.
- Let the seasoned chicken rest at room temperature for 10 minutes while you make the sauce and preheat the air fryer to 400°F for 3 to 5 minutes until the basket is genuinely hot.
- Melt the butter in a small saucepan over medium-low heat, add the minced garlic and stir for 60 seconds until fragrant, then add the honey, soy sauce, and chili flakes and stir over low heat for 1 to 2 minutes until smooth and glossy.
- Arrange the seasoned chicken tenderloins in a single uncrowded layer in the air fryer basket and cook at 400°F for 8 to 10 minutes, flipping once halfway through, until the exterior is golden and the internal temperature reads 160°F.
- Brush or spoon the honey butter garlic sauce generously over each tender while they are still in the hot basket so the sauce covers every visible surface.
- Return the glazed basket to the air fryer and cook at 400°F for 2 to 3 more minutes until the honey sauce bubbles, caramelizes, and sets into the sticky lacquered coating visible across the surface of every tender in the image.
- Remove the basket and immediately scatter the sesame seeds over the hot tenders so they embed slightly into the sticky sauce, then transfer to a white plate and pile high as shown in the image.
- Scatter the fresh chopped parsley or cilantro generously over the top of the pile so the green herb flecks are visible across every tender, then serve immediately while the sauce is still warm and glossy.
Leave a Reply